×
![]()
Using Wireshark on Windows 7 – Key Facts and Overview
- Wireshark is a traffic analyzer, that helps you to learn how networking work and how to diagnose Network problems
- To track SSL Traffic on Windows we use Wireshark with Session Key Logging
- If the Browser uses the Diffie-Hellman cipher we need to disable it
Understanding the SSL Handshake Protocol
| TLS/SSL Handshake Diagram |
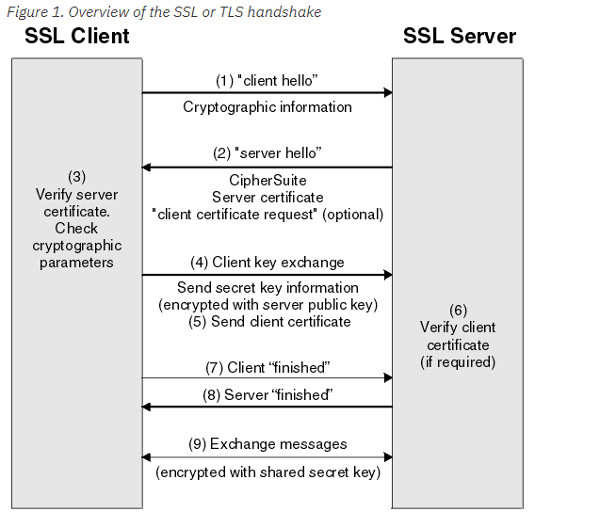 |
- The SSL or TLS client sends a “client hello” message that lists cryptographic information such as the SSL or TLS version and, in the client’s order of preference, the CipherSuites supported by the client
- The SSL or TLS server responds with a “server hello” message that contains the CipherSuite chosen by the server from the list provided by the client
- Reference:An overview of the SSL or TLS handshake
- Note: The “server hello” is very important as it Diffie-Hellman Cipher can’t be traced !
Disable the Diffie-Hellman Cipher for Browsers
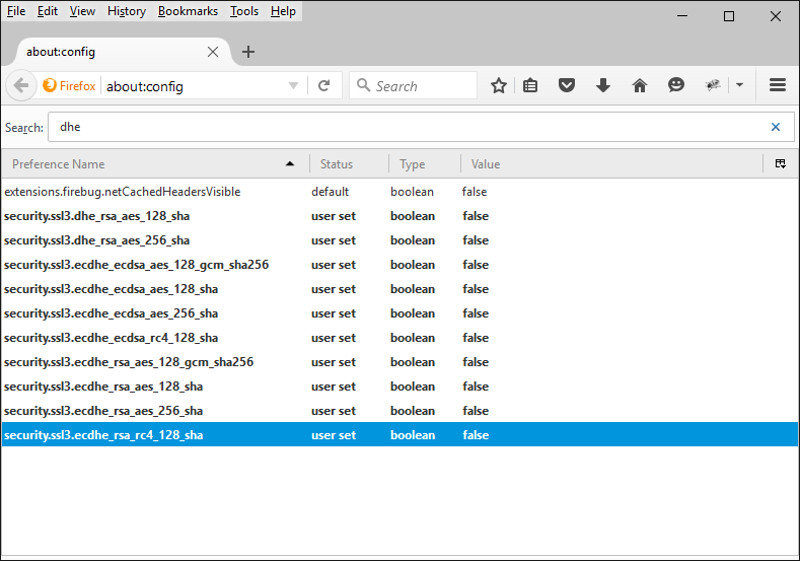
Disable the Diffie-Hellman Cipher for Firefox
- Launch Firefox, navigate to “about:config” from address bar
- Double click all the Diffie-Hellman ciphers starting with dhe or ecdhe to change the Value to false
- Restart Firefox to take effect
| Disable the Diffie-Hellman Cipher for Firefox |
 |
Disable the Diffie-Hellman Cipher for Chrome
- View the default Cipher Suites list from the Client Hello message of Chrome
- Append all the ciphers that contain “ECDHE” or “DHE” in hex to command line parameter:”–cipher-suite-blacklist” and launch Chrome
- Sample: chrome.exe –cipher-suite-blacklist=0xc02b,0xc02f,0x009e,0xcc14,0xcc13,0xc00a,0xc014,0x0039,0xc009,0xc013,0x0033
Cipher Suites (15 suites)
     Cipher Suite: TLS_ECDHE_ECDSA_WITH_AES_128_GCM_SHA256 (0xc02b)
     Cipher Suite: TLS_ECDHE_RSA_WITH_AES_128_GCM_SHA256 (0xc02f)
     Cipher Suite: TLS_DHE_RSA_WITH_AES_128_GCM_SHA256 (0x009e)
     Cipher Suite: TLS_ECDHE_ECDSA_WITH_CHACHA20_POLY1305_SHA256 (0xcc14)
     Cipher Suite: TLS_ECDHE_RSA_WITH_CHACHA20_POLY1305_SHA256 (0xcc13)
     Cipher Suite: TLS_ECDHE_ECDSA_WITH_AES_256_CBC_SHA (0xc00a)
     Cipher Suite: TLS_ECDHE_RSA_WITH_AES_256_CBC_SHA (0xc014)
     Cipher Suite: TLS_DHE_RSA_WITH_AES_256_CBC_SHA (0x0039)
     Cipher Suite: TLS_ECDHE_ECDSA_WITH_AES_128_CBC_SHA (0xc009)
     Cipher Suite: TLS_ECDHE_RSA_WITH_AES_128_CBC_SHA (0xc013)
     Cipher Suite: TLS_DHE_RSA_WITH_AES_128_CBC_SHA (0x0033)
     Cipher Suite: TLS_RSA_WITH_AES_128_GCM_SHA256 (0x009c)
     Cipher Suite: TLS_RSA_WITH_AES_256_CBC_SHA (0x0035)
     Cipher Suite: TLS_RSA_WITH_AES_128_CBC_SHA (0x002f)
     Cipher Suite: TLS_RSA_WITH_3DES_EDE_CBC_SHA (0x000a)
Testing SSL Decryption with Wireshark
Setup Wireshark
| Activate Session Key Logging on Windows |
Action |
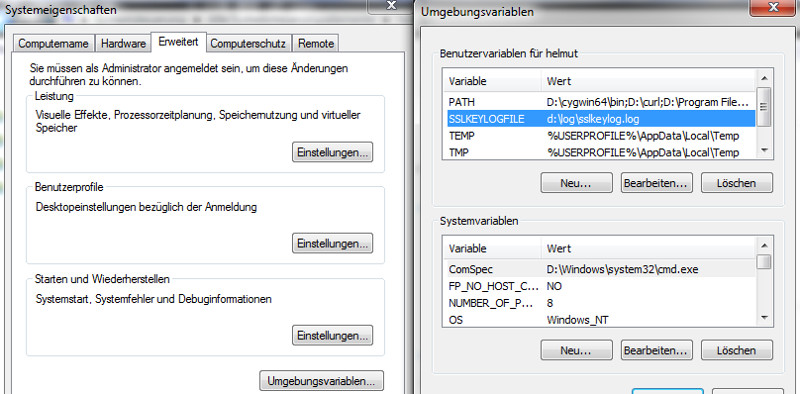 |
- Create SSLKEYLOGFILE enviroment variable
|
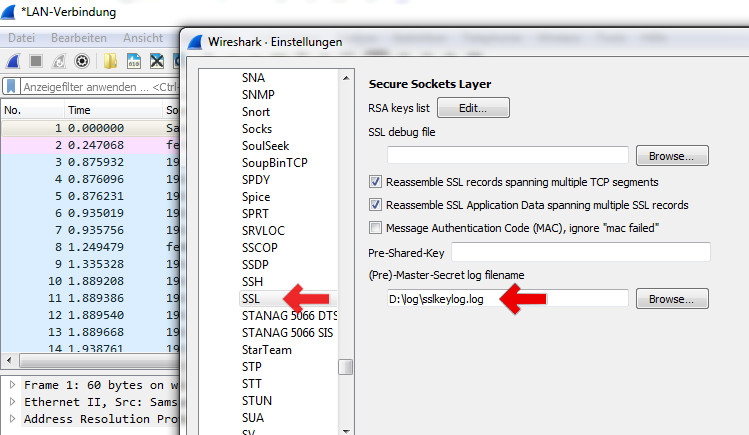 |
- Enable SSLKEYLOGFILE for SSL Protocol
|
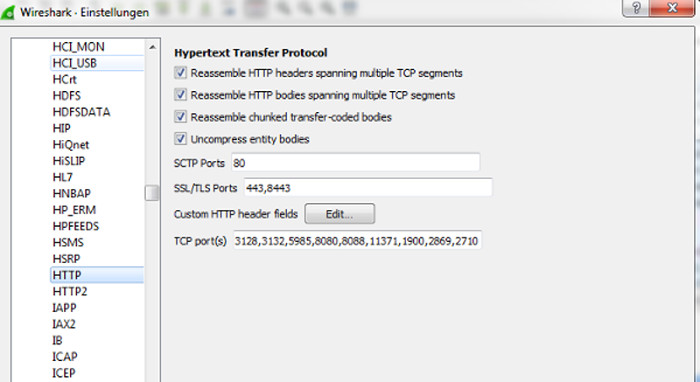 |
- If needed add add. HTTPS Ports like : Port 8443
- Edit -> Preferences -> Protocols -> HTTP
|
Run Wireshark and decrypt a TLS/SSL packet
| Run first https test against Google Website |
|
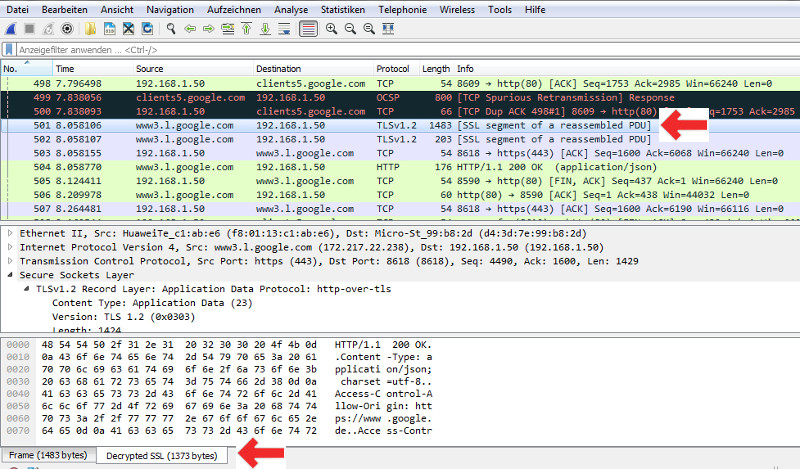 |
- Testing against https:/gooogle.de
- The decrypted SSL indicates that this packet was decrypted sucessfully !
|
Advantages / Disadvantages using Wireshark
| Advantages |
Disadvantages |
| A little bit complicated |
Very detailed Info for the complete Network Stack |
| You need to know a lot of Networking Details |
Client must support SSLKEYLOGFILE feature |
| Support only certain Browsers [ Firefox, Chrome ] and email clients [ thunderbird] |
No support for cURL and WordPress function like wp_get_remote() and |
Reference
Using Fiddler
Fiddler – How it Works
| Overview |
|
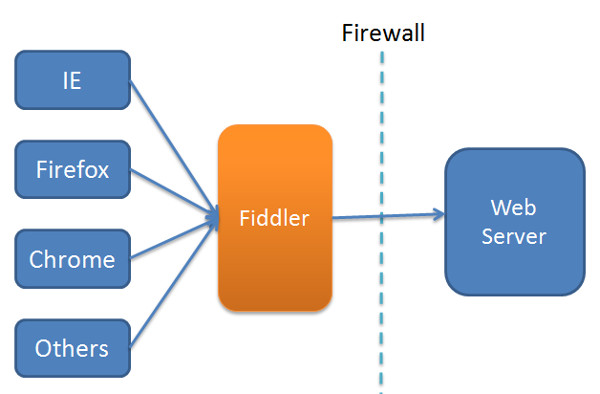 |
- To read HTTPS data Fiddler is acting like a Man-in-the-Middle
- Fiddler is listening to following Network proxy: localhost:8888
- On startup Fiddler registers as a WinINET-Proxy service
- All Browsers [ like Chrrome, Firefox ] taking care of this service sends its data to the >Fiddler-Proxy first
- Finally Fiddler sends the data to the Target Host
|
Setup – Enable Decryption of SSL/HTTPS traffic
| Setup |
|
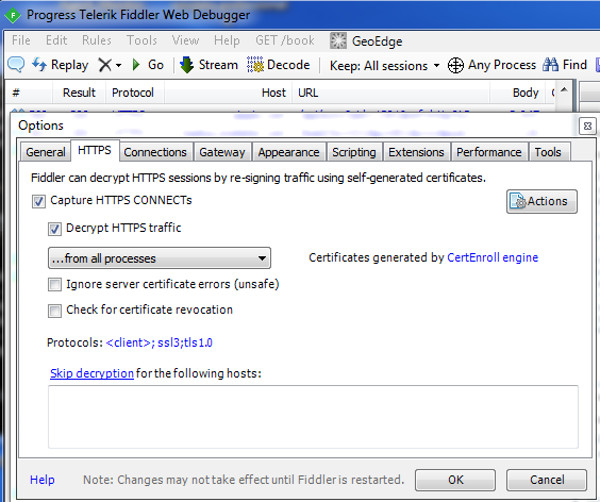 |
- Menu: Tools -> Option -> HTTPS
- Check: X Decrypt HTTPS Traffic
|
Decrypt cURL HTTPS traffic with Fiddler
| Using cUrl : add –proxy 127.0.0.1:8888 to the cUrl command |
|
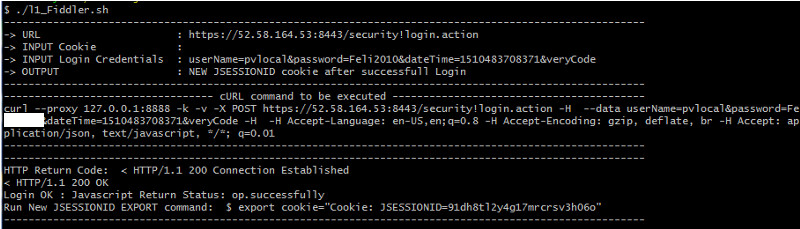 |
- Start Fiddler [Note Fiddler uses Portnumber: 8888 per Default ]
- Add –proxy 127.0.0.1:8888 to your curl command
|
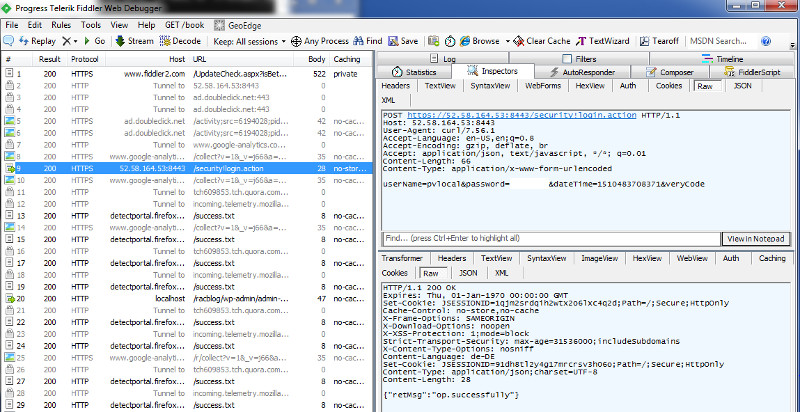 |
- Use Inspectors menu item
- This gives as a decrypted view of the HTTPS Post Request
- Note: Passwords and Username can now easily extracted
- Use the RAW menu item to get details about HTTPS Response Request like: HTTP Response Code, HTTPS Header and HTTPS Response Body
|
Decrypt WordPress HTTPS traffic for wp_remote_get()/wp_remote_post() with Fiddler
Application Details
Display Timelines with Fiddler
| Timeline |
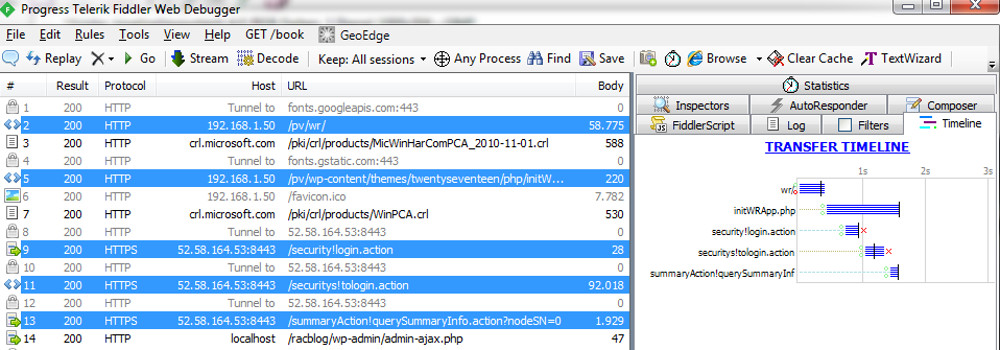 |
- Page load [ /pv/wr] is decoupled from the PHP processing
- PHP processing [initWRApp.php] is triggered via Ajax Request
- All Remote PHP processing steps [login.action, tologin.action and summaryInfo.action] runs sequentially
Display HTTP Packet Details with Fiddler
| Step1 : Initial Page Load |
WebBrowser -> Local Webserver [ 192.168.1.50] |
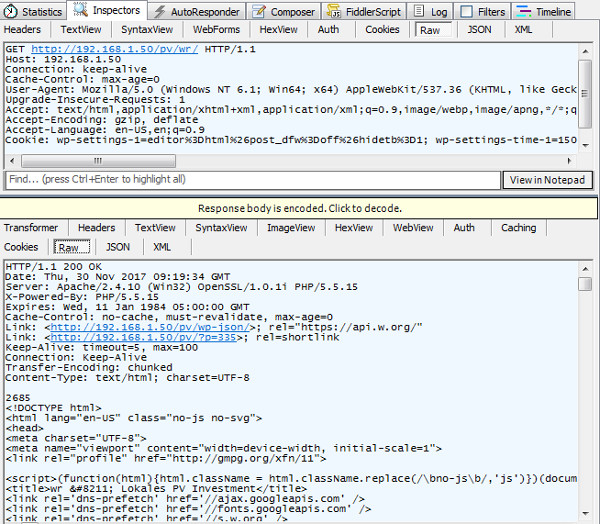 |
- Protocal: HTTP
- Http Get Request to load the initial Page
|
| Step2: Starting PHP Remote Processing |
WebBrowser -> Local Webserver [ 192.168.1.50] |
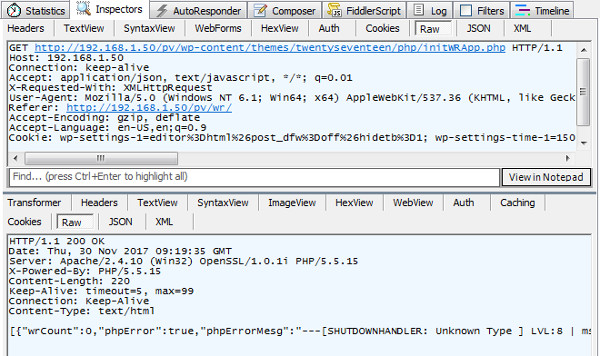 |
- Protocal: HTTP
- Http Get Request to start PHP Remote Processing with wp_remote_get and wp_remote_post
|
| Step3: Authenticate with Username/Password against Remote Webserver |
Local Webserver [ 192.168.1.50] -> Remote Webserver [ 52.58.164.53:8443 ] |
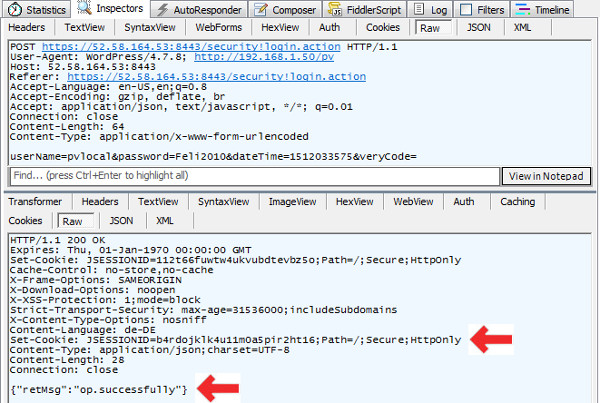 |
- Protocol: HTTPS Post
- URL: https://52.58.164.53:8443/security!login.action
- WordPress Function used: wp_remote_post()
- Remote Webserver return “op.successfully” if login OK !
- Remote Webserver return New JSESSIONID cookie if login OK !
|
| Step 4: Capture initial Page after Login into Remote Werbserver |
Local Webserver [ 192.168.1.50] -> Remote Webserver [ 52.58.164.53:8443] |
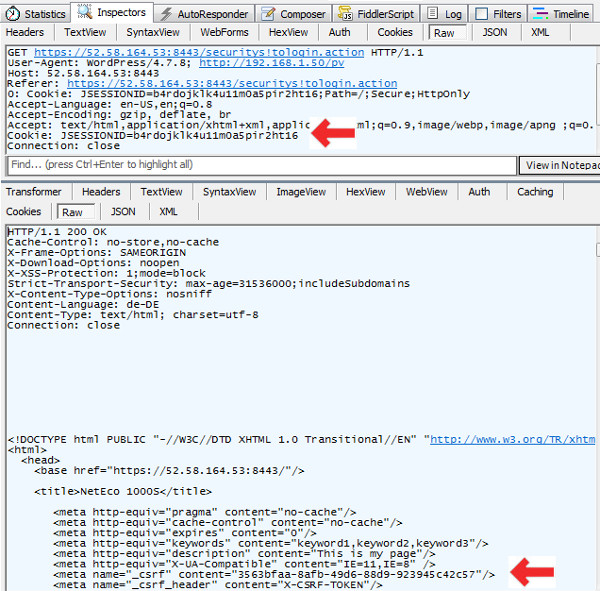 |
- Protocol: HTTPS Get
- URL: https://52.58.164.53:8443/security!tologin.action
- WordPress Function used: wp_remote_get()
- Remote Webserver return Initial Webpage after successful login!
- Remote Webserver return X-CSRF-Token which should be used for subsequent requests
|
| Step 5: Finally capture Data from Remote Werbserver |
Local Webserver [ 192.168.1.50] -> Remote Webserver [ 52.58.164.53:8443] |
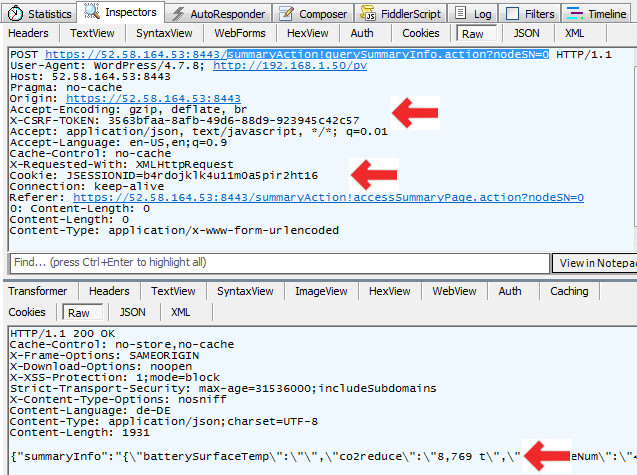 |
- Protocol: HTTPS Post
- URL: https://52.58.164.53:8443/summaryAction!querySummaryInfo.action?nodeSN=0
- WordPress Function used: wp_remote_post()
- Remote Webserver return Data in Json Format
- For this request we use JSESSIONID cookie returned from Step 3
- For this request we use X-CSRF-TOKEN returned from Step 4
|
Advantages/Disadvantages using Fiddler
| Advantages |
Disadvantages |
| Easy Setup |
Only HTTP/HTTP traffic can be monitored |
| Support all sort of clients like cURl, PHP, Browers, Email Clients, … |
|